Connecting to Google Services
With Nappai, you can connect to various Google services like Gmail, Drive, Sheets, and Calendar to manage your data and automate tasks.
To use these services, you must have a Google account. You can create an account at myaccount.google.com.
✎ Note
Nappai’s use and transfer of information received from Google APIs to any other app will adhere to Google API Services User Data Policy.
Connect Google Services to Nappai
❕Important
To connect an email ending in @gmail or @googlemail, you need to create a custom OAuth client in the Google Cloud Platform and get your project client credentials to establish the connection in Nappai.
There are two procedures to establish the connection in Nappai depending on the credentials you provide:
-
Default credentials provided by Nappai. Use this option if your company has a paid subscription to Google Cloud Platform and uses a custom domain name for Gmail (for example, yourname@yourcompanyname.com). Proceed to establishing the connection in your Nappai scenario where you can skip step 3.
-
Your custom credentials. You only have restricted access to Google APIs which doesn’t allow using default credentials provided by Nappai. You need to create a custom OAuth client in Google Cloud Platform:. Use this option if:
- You don’t have a subscription to Google Cloud Platform, use a free Google Account, and have your email address ending with @gmail or @googlemail.
- You use a paid Google Account, and you want to have more control over what the Google apps in Nappai are able to do. You need to gain the serviceusage.services.enable permission. If you don’t have this permission, ask the Google Cloud Platform Project Owner or Project IAM Admin to grant it to you.
Proceed to creating a custom OAuth client in Google Cloud Platform, and then establish a connection in your Nappai scenario where you need to follow all the steps.
Create and configure a Google Cloud Platform project
To connect to Nappai using your own client credentials, you can create and configure a project in the Google Cloud Platform.
❕ Important
You need to follow this procedure if you use an email address that ends with @gmail or @googlemail.
Create a Google Cloud Platform project
To create a Google Cloud Platform project:
- Log in to the Google Cloud Platform using your Google credentials.
- On the welcome page, click Create or select a project > New project. If you already have a project, proceed to the step 5.

- Enter a Project name and select the Location for your project.
- Click Create.
- In the top menu, check if your new project is selected in the Select a project dropdown. If not, select the project you just created.

✎ Note
To create a new project or work in the existing one, you need to have the serviceusage.services.enable permission. If you don’t have this permission, ask the Google Cloud Platform Project Owner or Project IAM Admin to grant it to you.
Enable APIs
To enable the required APIs:
-
Open the left navigation menu and go to APIs & Services > Library.
-
Search for the API you want to use. Use the table below to find the correct API for each Google service you want to connect to Nappai:
Google Service in Nappai Required API to Enable What This API Allows Nappai to Do Gmail Gmail API Read, send, and manage your emails. Google Drive Google Drive API Access, create, and modify files in your Google Drive. Google Sheets Google Sheets API Read, write, and format data in your Google Sheets spreadsheets. Google Calendar Google Calendar API Create, manage, and view events in your Google Calendar. Important: Make sure you enable the correct API for the service you intend to use. Enabling the wrong API won’t allow Nappai to connect properly.

-
Click the API, then click Enable. If you see the **Manage* button instead of the _Enable* button, you can proceed to the next step: the API is already enabled.
Configure your OAuth consent screen
To configure your OAuth consent screen:
-
In the left sidebar, click Google Auth Platform.
✎ Note
If you don’t see Google Auth Platform in the left sidebar, click View all products at the top of it, then pin Google Auth Platform to the sidebar.

-
Click Get Started.
-
In the Overview section, under App information, enter Nappai as the app name and provide your Gmail address. Click **Next.
-
Under Audience, select **External. Click **Next.
For more information regarding user types, refer to Google’s Exceptions to verification requirements documentation.
-
Under Contact Information, enter your Gmail address and click **Next.
-
Under Finish, agree to the Google User Data Policy.
-
Click Continue > Create.
-
Click Create OAuth Client.

-
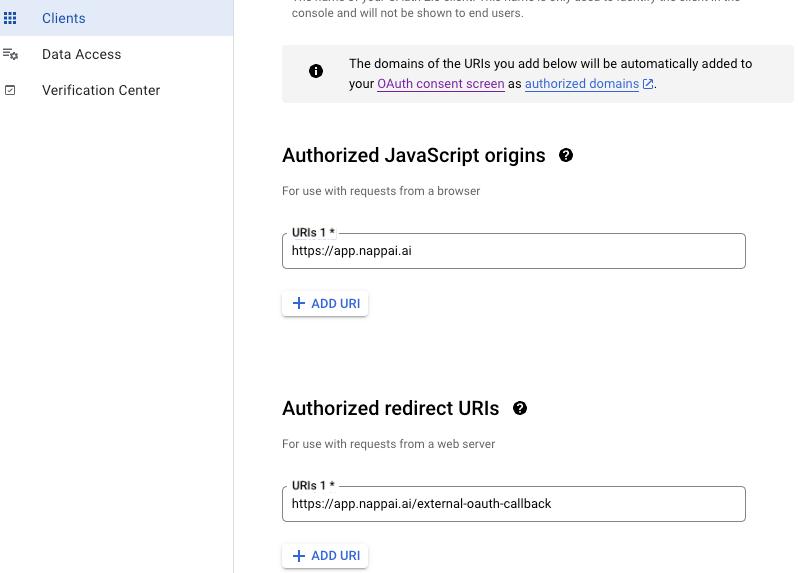
In the Clients section, add nappai.ai and app.nappai.ai. Also, make the following additions:
- Authorized JavaScript origins: Add
https://app.nappai.ai - Authorized redirect URIs: Add
https://app.nappai.ai/external-oauth-callback
- Click Save.
- Authorized JavaScript origins: Add
-
Optional: In the Audience section, add your Gmail address on the Test users page, then click Save and continue if you want the project to remain in the Testing publishing status. Read the note below to learn more about the publishing status.
-
Click Save.
✎ Note
Publishing Status
Testing: If you keep your project in the Testing status, you will be required to reauthorize your connection in Nappai every week. To avoid weekly reauthorization, update the project status to In production.
In production: If you update your project to the In production status, you will not be required to reauthorize the connection weekly. To update your project’s status, go to the Google Auth Platform, the **Audience section, and click Publish app. If you see the notice **Needs verification, you can choose whether to go through the Google verification process for the app or to connect to your unverified app.
Establish the connection in Nappai
To establish the connection in Nappai:
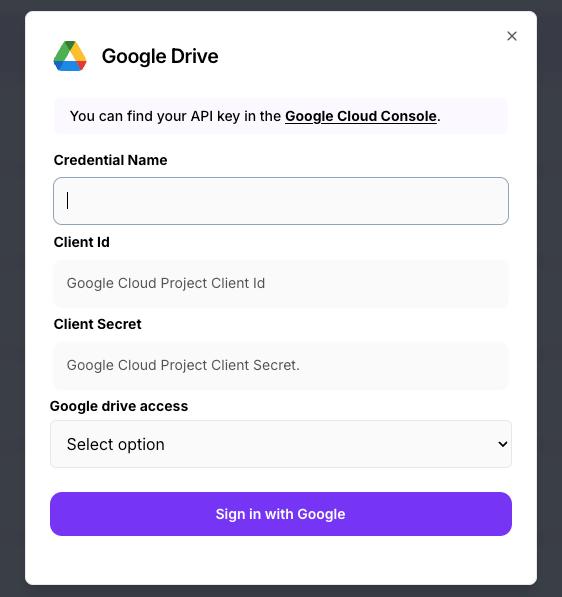
- Log in to your Nappai account, go to credentials.
- Add new credential. Find your google service credential.

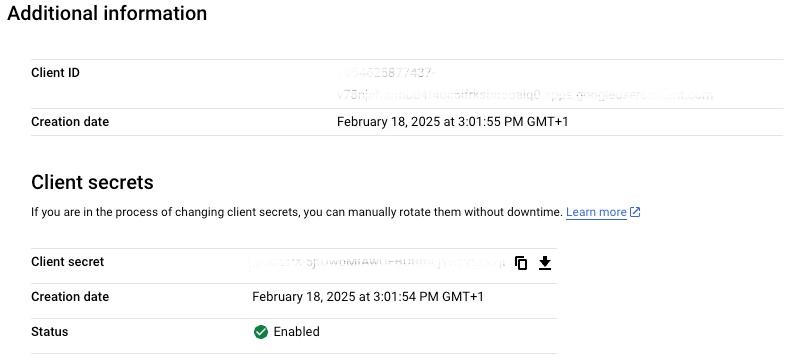
- Copy Client ID and Secret from Google Cloud Platform -> API & Services -> Credentials -> Aditional Information to Nappai credential form.

- Optional: In the Connection name field, enter a name for the connection.
- Click Sign in with Google.
- If prompted, authenticate your account and confirm access.
You have successfully established the connection. You can now edit your scenario and add more modules. If your connection requires reauthorization at any point, follow the connection renewal steps here.